Create, View or Edit a Neighborhood
TO CREATE (or Edit):
Step 1: Admin will click the "Admin" in menu, and select "Neighborhoods.
Step 2: Click the "+ Add" button to add a new Neighborhood (or click the pencil to edit an existing Neighborhood.)
Step 3: Enter Neighborhood Name; this is any description you wish, but keep it simple, short and descriptive so you can see them in a list and know which is which. Required field.
Coordinator: this is the coordinator for that Neighborhood. This is a required field. To add someone to the drop down go to the Users list (click Admin, then Users) and then edit the profile. At the bottom is "Set as NH Coordinator", this must be true to be in the dropdown. (be sure to save it). For more info on editing a profile click here.
Start Location: this is almost always "home" for a neighborhood. But you could add other locations in the "Locations" tool. (click Admin then Locations). Click here for more information on adding locations.
Drop Off Location: This must be set in the Locations tool (click Admin, then Locations. Be sure "Drop Off" is set for that new location). Click here for more information on adding locations.
Campaigns; These campaigns use a QR code and URL link that will automatically add a new donor to this neighborhood. You can click any of the campaigns to open the campaign and edit.
Active: When set to true the Neighborhood is Active. You cannot deactivate a neighborhood with donors, you must first Unassign them. Go to "Assign and UnAssigned Donors" for more information.
TO VIEW:
Step 1: Click the Admin menu item, then select Neighborhoods. Click the "pencil" next to the Neighborhood you wish to view.
VIEW NH MAP: This map displays pins to show where the users are located.
VIEW USERS: This button opens the Users list to see their status.
NEXT EVENT: This is the next Neighborhood Event. This date matches to the next Event Date on your Events list. (note, this may be found by clicking on the "profile" icon next to the Neighborhood Name

Screen Shot of the Neighborhood Window
Add Neighborhood Donors
There are four ways to add a user to a neighborhood. The Neighborhood must be created and active first.
METHOD 1: Admin opens the Neighborhoods List (Click Admin, then select Neighborhoods). Then select the "View Map". More details below.
METHOD 2: Add to profile. Go to Users (Admin/Users), at the bottom of the profile is a Neighborhood field, click the drop down and select the Neighborhood Name.
METHOD 3: Use a QR code or URL Link associated with a Campaign. More details below.
METHOD 4: Import a list. Contact the SimpleGesture.org site admin for assistance, this method is where there is an Excel template with User information. info@SimpleGesture.org

This is METHOD 2, at the bottom of the Profile for any user. Click the dropdown box and select
Adding and Removing Donors using MAP
Click "Neighborhoods" from the Admin drop down, and then click VIEW MAP. (be sure you aren't in a specific neighborhood, if so it says "View NH map" and will only display the pins for that specific neighborhood.
On the left side is a list. "Unassigned" is at the top, followed by any neighborhood you have set up. The neighborhoods get a code name; AA for the 1st one, AB for the second and so on. To the left of each name is a box, if you click the box the pins will be displayed (you also need to scroll in and out to reveal more pins and more neighborhoods).
Click any neighborhood name on the left side, it will turn yellow. (see photo gallery below). This also opens up a special window titled "Neighborhood Selected" (see gallery). You have 3 tools; Assign, Sequence and Unassign.
HOW TO ASSIGN and UNASSIGN:
Click "Assign", and you'll get a new window titled "Assign Mode" with 3 choices; pin, polygon and cancel.
- The "Pin" mode lets you click on any pin, as you do so that pin is assigned to that neighborhood. You can click as many as you want, then click "Save", or click "Cancel" to start over.
- The "Polygon" mode lets you draw a polygon (a multi-sided shape) around a set of pins. You can experiment with it, and you'll see how it works. Just click "Cancel" to start over. When you're ready to pick pins, scroll in so you can see clearly. Draw the polygon around the pins you wish to assign, then click "Save".
Click "Unassigned" and do the same things above, except this time it changes the pins from blue (assigned to a neighborhood) to unassigned (which puts them back into your pool of donors to be picked up by drivers assigned by our "Optimization" route tool.
Click "Sequence" to set the pins into a specific order for the route. You can also let the Neighborhood Coordinator do this (we recommend you do a Zoom meeting, and teach the NHC how to do it).
HOW TO SEQUENCE:
Sequencing is done to create a Route Order. We do not do this with Google Fleet Manager since most Neighborhood Coordinators are already familiar with their neighborhood and the route they prefer. Once the sequence is set, it remains the same for all future events unless it's changed.
There are two methods;
- clicking pins from start to finish in the order you wish
- Drag and Drop: dragging a name from the list on the left to the right position.
We suggest to use the pin method for the 1st time, then as new donors register use the drag and drop. If you use the pin mode it removes all the sequence #'s, you are starting over each time.
PIN METHOD: After you have selected "Sequence" select "Pin Method" on the "Start Sequence Mode" box that appears. On the left you'll see all the donors highlighted in red (see photo gallery). It will ask you to click the first pin, this assigns that pin #1. Continue until done. As you go, you'll see the #'s appear. If you make a mistake on one pin, keep going! its easy to fix with the "Drag and Drop" method.
You'll see the names highlighted in Red on the left go into a sequence, with the PIN number. Be sure to click SAVE!!
DRAG and DROP: This is best if the list has already been sequenced and you just have a few new donors.
Step 1: After you have selected "Sequence", you'll see in the "Start Sequence Mode" option #2, which is to just drag and drop. Go to the list on the left to do this.
Step 2: Drag any name in red, or any other name, up or down. This is done by clicking on them with the left mouse button, then drag to the position they need to be and release the mouse button. If they don't respond, try refreshing your web page (the refresh button is part of your browser, if you don't know how to do it you'll need to do a google search "how to refresh a web page on Safari (or chrome, edge, etc)".
Be sure to click "Save" when done. Or if you want to start over, click "Cancel".

Map displays blue pins for a neighborhood and red pins for other donors
Adding Neighborhood Donors using CAMPAIGNS
If you're not familiar with how to add Campaigns, click here for more information.
Create a normal campaign, (click here to learn how) using whatever you wish for the photos and story. This gives you a unique QR code and URL Link. Send that QR code and URL link to your Neighborhood Coordinator or anyone that is going to register donors into this neighborhood.
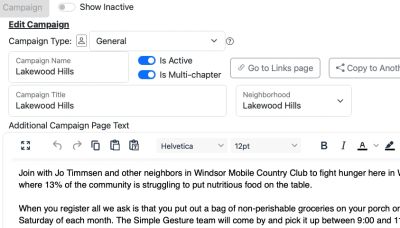
The one thing you need to do that is special; in the campaign there is a dropdown titled "Neighborhood", that needs to contain the name of the neighborhood. Once selected, this campaign will also be displayed in the Neighborhood Detail window for that neighborhood, its clickable so you can get to it from that window.
Map displays blue pins for a neighborhood and red pins for other donors