CHAPTER PROFILE
Access Chapter Profile from ADMIN on the main menu. The fields with * are required.
Chapter Profile handles 3 topics, each with their own tab;
- Chapter Details (General Information)
- Chapter Resources (sets up your home page; logos, banners, story)
- Zip Codes and Zones (your area served)
TAB I: CHAPTER DETAILS:
Chapter Brand Name; This is how you wish your name to appear on your Site Page, it will be what donors and driver see when they log in. If your Chapter is going to run a territory for "A Simple Gesture" the name will be [Territory] Simple Gesture. Example; Santa Rosa Simple Gesture. Once the chapter is approved the Chapter Brand Name can only be changed by the Site Admin, write to info@SimpleGesture.org to request a change. When you set up your chapter we will help you find the best name.
Chapter Phone and Email; this information is not visible to donors and drivers, it is for the Site Admin to contact you. There is a place to enter the phone and email you wish donor's see further down.
Chapter URL code. This needs to be a unique combination of letters that identify your chapter, these appear in the URL (the website address) for your chapter so its advisable to use letters that are similar to your chapter name. A common URL code is an abbreviation of your city name. "Santa Rosa might be SanRo". Once this is set it cannot be changed. We will help you define this when you set up your chapter.
Chapter Website; This is a website you may already have for other purposes. This information is not visible to your registered users, only to the Site Admin.
Home Screen Phone and Email; This is the phone and email that drivers and donors will see, they will use this information if they have questions. It can be a good idea to get a generic number from google voice or another service and a general email [ChapterName@gmail.com], and then redirect those to your Chapter Admin that is in charge of this program.
Drop Off and Driver Start Locations: These are system defaults, you can edit them for each driver when you create an event. You must first create these in "Locations".
Scroll down this page a bit to the "Locations" section to get a better understanding of how Drop off and Driver Start are used. Keep in mind, these are just the defaults, you can have many pick up and drop off locations that can be assigned within the events.
ALTERNATIVE DONOR TYPES:
By default, all donors are presumed to be "Doorstep", meaning they will leave a bag of food on their doorstep. When a donor registers, this is their "Type". However, in their profile they may have alternative types.
In order to have an alternate type, you need to switch it on and finish the setup. Below are the 3 options which you can switch on. If they are "on", the donor can change their "Donation Type" to one of them.
- Allow Self Deliver; This feature will give any donor the option to bring their donation to the pantry on their own. You need to set up a "self deliver"Location first. (scroll down this page to learn more about Location).
- Accept Donations; This feature will give any donor the option to donate cash to the pantry on their own. You need to set up a "self deliver URL web link. By default it is set to us at SimpleGesture.org. We hope you leave it as the default because this small amount of cash that comes in this way helps us pay for all the features of this site.
- Online Store; This feature will give any donor the option to shop on an online store of your choosing. Amazon makes it easy to set up a storefront, just do a web search on "Setting up an Amazon Store Front". You add the foods you want and the delivery location.
In addition to a donor able to change their "Donation Type", if a donor says "no, they cannot participate in an upcoming event" they will get an email offering the same alternatives you switch on above.
TAB II: CHAPTER RESOURCES:
This section builds your "Home Page". (advice; make your home page have the look and feel of a local program. We provide defaults for everything, and some of those are ok but it's better if you customize this to fit your local community).
Chapter Logo; This is an image of your logo, it needs to be about 200 x 60 pixels to fit properly, although you can try different sizes. Step 1 is to save your logo's image somewhere and then step 2 is to "choose file" to upload it. The default is the "A Simple Gesture" logo (recommended).
Chapter Area Served; this can be an image you create using any drawing tool such as Powerpoint. Or, you can draw an image on the next tab (zip codes/zones) and save it. This image will show your users the area you are covering with your program. There is more information on this further down in this section.
Chapter Banner Image; This is an image that displays your brand 'phrase' or tag line. The recommended size is about 250 by 25 pixels. The default is the "A Simple Gesture" banner.
Chapter Photo; This image will appear on your Home page. You might pick an image of donors working at the pantry, or a driver picking up a bag from a doorstep.
Chapter Needs List; this image will appear when your donors click a link on their email notification, allowing them to see any special needs for your pantries. The recommended size is 350 (wide) x 500 (high) pixels.
Chapter Story; this area has a variety of tools to create a nice looking text that appears on your Home Page. You can use different fonts, page breaks and even add images and hyperlinks.
TAB III: ZIP CODES and ZONE DEFINITIONS:
Zips and Zones can be simple or complicated. We recommend the simple way at first, most chapters never need to get into the complicated approach.
Simple Method; Add all your zip codes. Add one zone, give it a name like your city or county. In the zone, put a check mark next to each zip code. Your done!
Complicated Method; To go this route you need to first understand how "zones" are used. When you create an event you'll decide which zones to include. A zone is simply a collection of zip codes.
If you have a large area, like a county with a large population, and you have a lot of donors (more than 500, for example) you may not want to pick up the entire area the same day. This is where "Zones" come in. You might have NW Santa Rosa for one event, and SW for another the following weekend, etc etc.
If a donor registers and uses a zip code that is not on your list, they can still register but will be set to “out of area”, meaning they can still be a driver or donor, but they will not be included on routes. (For example, a donor can self-deliver, make a financial contribution or shop on an on-line store). NOTE: if you later add their zip code you need to go to their profile and uncheck "out of area".
IsActive: Every Zip Code and Zone have switch to set to inactive. Once it's set to inactive, the zip code or zone is no longer part of your chapter. By default inactive items do not show on the site, but there is a "show inactive" switch that will display them if you want to switch one back to active.
Area Served Map; You can use the polygon tool, the circle tool, or the square tool to draw a shape. This is informational, and allows you to create your "Area Served" Map on the Chapter Resources tab.
Once you have completed the drawing, click "Update Area Served Map". (be sure to click save when you're done!). This is optional, you can also upload a map you create using another graphics program to display on your home page.

HOME SCREEN

The Home Screen is what Donors, Drivers and Visitors will see when they visit your site.
Your Profile Resources Tab is used to create the information displayed on this screen
DASHBOARD
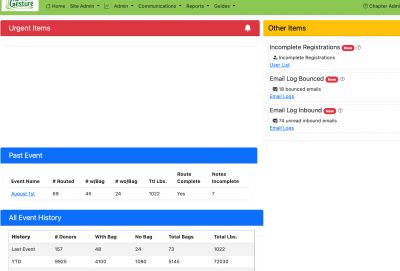
The Dashboard provides the Chapter Admin a view of multiple things. Think of it like the dashboard in your car, important information at a glance.
- URGENT ITEMS: When these pop up Admin also gets an email and text because they need to be dealt with immediately. They cover a wide array of topics, usually regarding things needing attention for an upcoming or just completed event. Click the "?" next to the item to get more information about the problem. Often you'll find a hyperlink to the page in this help guide that directly covers the problem and options to fix.
- OTHER ITEMS: These are similar to Urgent Items, except they aren't urgent. They are system notifications that need attention. Don't ignore them, just get to them when you have time.
- PAST EVENT: This is your most recent event results
- ALL EVENT HISTORY: This is Year to Date, last year, and all years combined.
LOCATIONS
LOCATIONS are places you want your donors and drivers to know about. For example an important location is the Food Bank or pantry where you want to deliver food.
You access this by screen by clicking ADMIN from the main menu, then select “Locations”.
A Location can be any or all of the following things;
- A Drop Off; where the drivers take the food (a pantry)
- Self Deliver; where any donor can take their food (a pantry)
- Driver Start; where a driver may start their route (vs. starting at home, they might start at a church or other central location. This is common when they go somewhere to pick up the bags).
(you can also set a location to 'inactive')
Click "Add Location" to add a new location, and then decide which of the above are true for that location. You can make one location all of the above, or just choose one or two.
Location Notes: Notes help provide drivers or donors essential information. For example, you would list "hours of operation" if the location is "Self Deliver". You might want to put "deliver to the back" if it's a drop off location.
One tricky thing is when you use locations for more than one purpose, and each purpose has a different note. For example, perhaps "Driver Start" is in the front parking lot of a pantry, and "Drop Off" is the dock on the back of the building.
To solve this, create two locations; perhaps calling one "Pantry Driver Start", with the appropriate note. And the other "Pantry Drop Off" with that note.
DETAILS ON LOCATION TYPES:
Drop Off: This is a Food Bank or Pantry in your local area. Do a web search "Free food in (city name)". Many churches have their own pantry. Food Banks usually provide support to Pantries, but often times the Pantry must buy the better qualify foods from the Food Bank or from wholesalers.
You will be picking up 'better quality', so you may prefer to deliver this directly to a pantry, they will love it because it improves the quality of what they give out and often replaces food they had to buy.
When you set up your location, it's a good idea to put in a note. Many pantries are not easy to find, often behind a main building. Or the distribution may be behind a building.
Driver Start: This is where your drivers will start their routes. There are a few things to consider.
- How will the drivers get their bags and information cards? Usually this is the same place they start. But if you have certain drivers that will start from their Home, you will need a way to get them their materials in advance.
- The default Driver Start is set in the Chapter Profile. This should be a central point in your territory. Perhaps it's a donut shop (comes in handy if you provide free coffee!) or a Starbucks. You can also default to "Home".
- If you have a big territory it may be practical to have multiple start locations. One might be the default, but then you will have certain drivers start from "Home" or an alternative start point. When you create an event every driver gets the default setting. In the Driver Selection tool you then can set each drivers start location one-by-one.
Self Deliver: This is the location a donor might bring their bag themselves. This is uncommon and a minor part of "A Simple Gesture". A donor can change themselves to "Self Deliver" in their profile.
Often this is because they don't want to donate and find it easier to say this vs. just setting themselves as "not a donor". But sometimes it's because they cannot leave a bag on their doorstep (they live in a gated community, for example).
These donors will get a notification on the Event Day to bring their bag to a particular spot. Often times it's the same as the "Drop Off" Food Bank or Pantry.
Try to pick a place that is usually open. Add their days/hours of operation in the notes, these are included in the notification that goes to the donor.
INACTIVE: Any location can become inactive, if so, click this button and it won't appear on various drop downs.
See images below for examples;

Locations Examples

This is the main view of all locations, note that any location can be a drop off for donations, pickup for bags, self deliver for donation, and starting point for a drivers route.

This is the detail screen for a location. Any location can be identified as a drop off for the drivers food donations, pickup for bags, self deliver for a donor to self deliver their food donations, or driver start point for the route. Also note, information such as locations open days and hours will appear in relevant notifications.
Registered Users/User Management Page
There are 2 User Lists in the SG Web App.
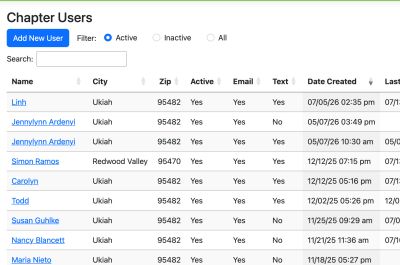
- Chapter Users : lick Admin, then select "Users" from the menu items. This is the quick one, it loads fast and is best for looking up a user quickly. C Each column has a sort icon, just click it a couple times to see how it sorts. There is a "Search" field to enter the users name or email.
- User Report: Go to "Reports" then select "User Report" from the drop down items. It contains more data, such as the campaign they used to register, next event data, and much more. It loads slower so is best when you want to see data by sorting the columns.
USER MANAGEMENT PAGE:
Throughout the Web App you'll see user names are underlined, this is because. you can click them to open the "User Management Page".
There are 4 TABS: Summary, Communications, Profile and Log In as Users
SUMMARY TAB:
- review summary information such as name, address, email, profile summary, next event info, donor history, and change history
- NOTES: You'll see "Admin Notes" which are prior notes you have entered, and a "New Note" to add notes. These are private, the user will not see them. For example, if there is an issue or incident you wish to recall you might enter it here.
- Click the donor history line to see details for each event
- Click "Show User Change Details" to see any changes they have made to their profile
COMMUNICATIONS TAB:
Click this tab to see incoming and outgoing emails and text, and to send this user a email or text.
PROFILE TAB:
From here you can view and edit their profile.
DONOR TYPE: This allows a donor to be set as "no", "doorstep", "Donate money", "shop online" or "Self deliver donation". Their Donor Type then defines the type of notification email or text they will get for future events.
DRIVER TYPE: This allows a user to be eligible to drive in future events.
CHANGE PROFILE INFORMATION: by clicking on the pencil, you can edit any users profile. You will see a section "Admin only" that gives you access to fields they cannot see.
OUT OF AREA: This allows you to set a donor "out of area" meaning they will not be included in any routing. You can also do this from the Event Route Map, see Event Routing for details.
LOCK TO DRIVER: This allows you to tie a donor to a driver. If that driver is driving, they will have this donor on their route. We do not recommend to use this feature, it can get complicated quickly.
IS ACTIVE: this allows you to set anyone to inactive, inactive is = delete, meaning they will not longer be in any part of the system.
NEW PASSWORD: This is used if you wish to reset someone's password yourself, then you would email them the information.
CAMPAIGN CODE: This is set by the "Campaign" form, see "Campaign" for more information. This is a special code to show how the donor was registered.
Make Chapter Admin: When you turn the slider on (blue) this person will have the same capability as you. Soon we will create a specific role for Event Manager, which limits what they can do. You'll want to turn this on for anyone that is an Event Manager.
Make Chapter User; This should always be set to "True".
Set as BB Planner; This is for future development use
"LOG IN AS THE USER" TAB;
If you do this you will be logged out as Chapter Admin, and Logged in as that user. You can see and do anything that user can do. This is useful if you wish to see a donors event page or a drivers route, for example.
If you need to change the users status for a specific event you'll do that on the EVENT DETAILS page. Go to Reports/Event Details and pick the event. Find that user, and click the pencil. You can then change their status if they have one. A donor will only have a status for an event if the 1st round of notifications have been sent (usually a week before the event).
Campaigns
Campaigns are a great tool to add donors to your chapter! They create custom web pages that have a "Register" button.
Here is a quick list of the powerful features;
- Every campaign provides a QR code and URL link. The QR code can go on printed information cards and pamphlets. And the URL link can be sent out via email or on social media or on a Chapters web page.
- A campaign can be set up to register people directly into a Community Circle or to a Neighborhood Coordinator. Or the campaign can register people into the "Donor Driver" pool that optimizes routes.
- A campaign can include images and a story (the message you want potential donors to read).
- A Campaign will track results; you will be able to see how many donors registered. This is very useful to evaluate your results. Sometimes you may even set up an "incentive campaign" where there is reward to the person running the campaign, these are very effective! Read more about it in "Adding Donors".
You can read more about how campaigns work, where and when to use them, and other information by clicking here. The rest of this page is focused on how to create a campaign.
HOW TO CREATE A CAMPAIGN:
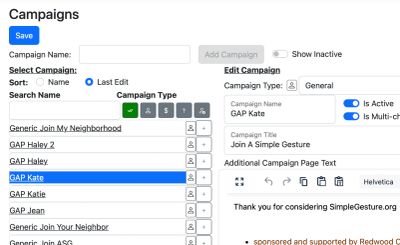
On the "Campaign" page (Admin/Campaign), click "Add Campaign",
Campaign Name; this is a name for just you to see, helpful for sorting the campaign list and searching for this campaign later.
Campaign Title; This is what shows up on the top of the web page when someone opens it.
Copy to Another Chapter: This handy button allows you to send a copy of a campaign to another chapter. This is useful if you have created a campaign with some special graphics or text and you want to share it with someone else. They will have a message on their campaign screen alerting them that a campaign has been shared and added to their list.
Campaign Type: There are 3 types of campaigns to match to the 3 types of events (click here to read more about the 3 event types);
- Donor Drive; This campaign registers donors into your program that will be routed using the "Route Optimization" event we call "Donor/Driver". This type puts all donors and drivers into a large pool that then breaks them into "least mile optimized routes". (click here for more information).
- Neighborhood; This campaign will register a donor directly into a Neighborhood. They will be managed by a Neighborhood Coordinator.
- Community Circle; this campaign will register a donor directly into a Community Circle. This type of event has donors bring their food donation to a central meeting point, like a clubhouse or school room. (click here for more information).
'Neighborhood' or 'Community Circle' Link: This field is displayed if you pick a Neighborhood or a Community Circle as "Campaign Type". When you set the link, anyone registering through this campaign will be placed into that neighborhood or community circle.
Campaign Text; Here is where you create the "body" of the customized campaign web-page. There is default text to get you started, but it's a good idea to modify the language for the people that will be reading it.
There is a tool bar that gives you editing capability to change fonts, colors, and other formatting.
Top Image; This image will be at the top of your Campaign page. Be sure to insert a small sized image. If your image is too large it won't look right. There are tools on the internet or already on your PC/Mac to resize images. For example, on a Mac open the image in "preview" and then resize.
Bottom Image; This image will be at the bottom of your Campaign page. Be sure to insert a small sized image. If your image is too large it won't look right. There are tools on the internet or already on your PC/Mac to resize images. For example, on a Mac open the image in "preview" and then resize.
URL Link: This is the link you can copy and paste into an email, put on Social Media, or share in other ways. Anyone that clicks this link will be taken to your campaign page.
QR Code: This code can be copied and paste to any document, such as a flyer or brochure. When someone scans the code it will open your campaign page. A typical examples is a "Join Our Chapter" flyer.
Open QR Link: Use this to see what your campaign will look like. (be sure to save it first). hint; You can resize your browser window to see what it looks like on a smart phone or smaller form factors.
Campaign Examples

Example of a Sorry We Missed You Campaign Page

A Link for the Home Page
COMMUNICATIONS: Messaging
Send Emails and Texts to Donor and Drivers
MESSAGING can be useful, but please be very careful when and how you use it. Donors and Drivers already are getting several emails and texts from the system, including up front notifications and after event results and "Thank You" or "Sorry We Missed You" communications.
Some reasons to message;
- If you don't have enough drivers, you then send a message to all donors asking for them to write back to you and offer to drive (this is better than giving them all the steps to change their profile on their own, change it for them).
- Perhaps you want to run a special campaign, like a booth at the county fair. You want to ask your donors to stop by for a special gift (you make buttons saying "I Love Simple Gesture!", or have hats or t-shirts).
A good rule of thumb is no more than one every 3 months!
Click "Communications" in the green menu bar, then "Messaging" to open the tool. You can send messages by Event (for example, if you have an upcoming event it will be listed. All users for that event will get the email). You can also send email by "Zone".
SENDING EMAILS BY EVENT or to all Users:
1. Select the "Event Messaging" tab after opening the "Messaging App" from the Communications drop down. Click "Event" to then select the event you wish. Or click "Users" to send a message to your entire User List.
2. In either case you can use the filters to pick certain users, such as donors or drivers. And certain situations, like those participating in the event or those not participating in the event.
3. Type the text you wish to send. We recommend starting off with Hello [[Firstname]], This will look like "Hello Julie, xxxx" to the users. (note: be sure to get the syntax exactly right; [FirstName] will put the wrong text in the email, rather than "Hello Julie" it will read "Hello [Firstname}, and everyone will be confused!
4. Give the email a title. Avoid punctuation and 'trigger words' which may cause the email to go to spam. Trigger words can be "Sign Up Now", or "Donate". Do an internet search for words that are not recommended (this goes for the body of the email as well).
5. Triple check everything!! this is an easy process to make a mistake, and the result can be confusing to your donors and drivers. Once your sure you have it all correct click "Send Email"
Come back soon to see how to send texts, for now you can only send emails with this tool
